Purchasing a Sewing Pattern to Fit Your Body
You’re looking through the pattern books at a fabric shop for a dress pattern or, you’re having a look on-line at the available patterns.
You want the garment to fit you well, so when it comes to purchasing a pattern you need to use the measurements on the pattern packets at the back.
Some patterns (e.g. Vogue) are known to be a bit on the smaller size, so please be aware of this.
1 Measurements
You need to have YOUR measurements, not the ones you want to be, or think you are.
REMEMBER they are only a number on the tape measure and they will certainly be a different size than what you purchase in a shop.
Most people have an idea of what size they are eg 8, 10, 12, 14 or XS, S, M, L etc.
Different shops or designers will use their own size labels, which makes it even harder to know your ‘correct’ size, so purchasing patterns will also be the same with sizing.
Example; if you buy a size 10 at one shop and fit into a size 12 in another, you could be a size 10, 12, 14 or 16 in a dressmaker’s pattern. Don’t fret about this, it often happens.
MOST dress patterns are purchased using the BUST measurement. You can adjust the WAIST and HIP measurements easier than the BUST.
PANTS patterns, purchase for the wider part of the body eg; WAIST, HIP, LOW HIP etc. You can take in a waist using extra darts or reshaping the waist style by adding tucks.
2 Taking Measurements
The best way to have correct measurements done, is to have a professional take them, however that is not always easy, especially if it is the weekend or late at night.
Taking measurements can be difficult to do on your own, so grab a close friend to help you.
Tie a skinny dressing gown belt or string around your waist and leave this on; this will help define your natural waist line.
Put a chain around your neck so it sits up on your collar bones (natural neck line), these will also help give a point to measure from.
Make sure you have the CORRECT underwear on, as this can change the final fit of a garment or the way it sits on the body.
A dress may not fit if the bra used to have measurements taken is a t/shirt one and you wanted to wear an uplifting or padded one with the final garment.
So always start with the CORRECT undergarments in the first place.
This is critical with firm fitting garments or bridal apparel.
Make sure you keep the dressmaker tape measure LEVEL and SNUG at all times.
Always round the number UP.
Write down the measurements on a note pad, the body image below if you print it out, or a tablet, some people take an image, that’s up to you.
For Dresses you need the following;
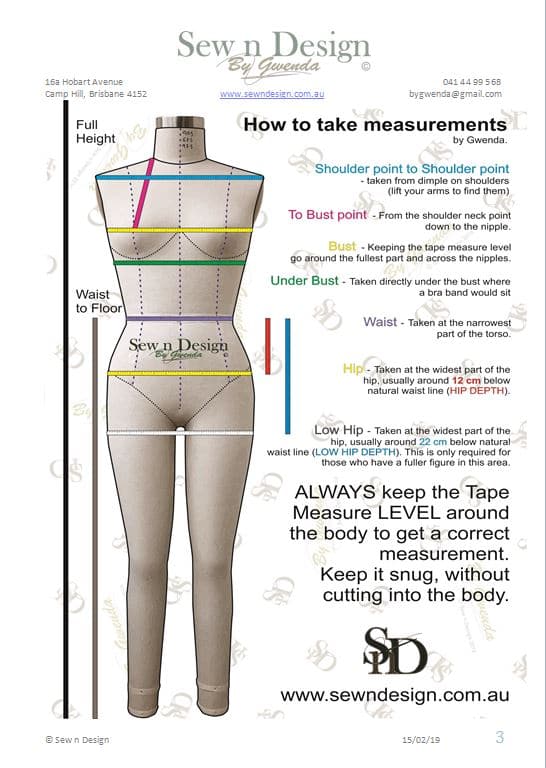
BUST – Place the tape measure LEVEL around the body at the fullest part of the bust/chest, at nipple level.
NATURAL WAIST– if you have placed a thin belt or string around it should be sitting at the waist level. If it is not then to find the waist, place your thumb below your last rib and place your little finger on the top of your hips. Your natural waist line will be the skinniest/narrowest part of your torso in this area. Stand up straight and breathe out while taking the waist measurement and remember the tape measure should sit level and snugly without cutting in.
HIP – Standing straight, place the tape measure around the widest part of your hip area. This is usually around 12 to 14 cm (4.5 to 5.5 inches) below the waist line (called HIP DEPTH). If you have the string or belt tied around your waist line it helps to give you a point to guide you below the waist.
Some people need to take a measure around the largest part of the buttocks as well. This can be around 24cm (9.5 inches) below waist line (LOW HIP DEPTH). Make sure you write both measurements down and how far below waist they were measured.
SHOULDER TO BUST POINT – using the neck chain or string you are wearing, measure from the top of the shoulder where the chain/string sits naturally on the shoulder neck point, down to the bust point (nipple).
SHOULDER TO SHOULDER – The easiest way to take a shoulder to shoulder measurement is to find the DIMPLE on each shoulder. To find this, lift your arm up level, there should be a gathering of skin (dimple) at the end of your shoulder. Place the tape measure on this point when the arm is down, take it across the body to the dimple position on the other shoulder.
Links to sewing pattern web sites below;
https://www.simplicity.com/patterns/
https://www.mccall.com/
https://voguepatterns.mccall.com/
https://kwiksew.mccall.com/
https://www.simplicity.com/our-brands/newlook/
http://www.burdastyle.com/pattern_store
https://www.tadahsewing.com.au/collections/patterns
https://butterick.mccall.com/
https://patternemporium.com/collections
https://allthepreciousthings.com.au/collections
https://indiestitches.com.au/
https://www.tessuti-shop.com/collections/digital-sewing-pattern-downloads